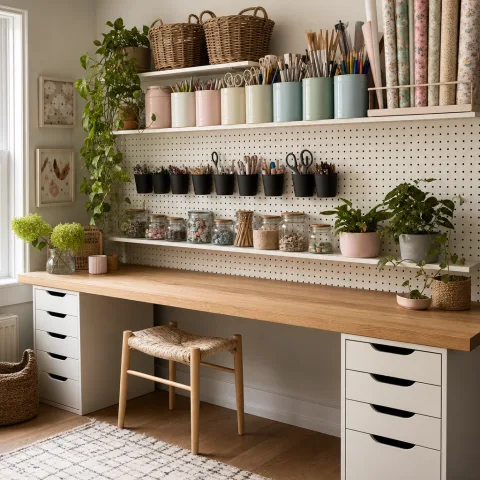
Over several weeks we designed, cut, and installed a pegboard tool wall from one sheet of birch plywood, treating the project as a field test rather than a finished piece. Our aim was to prove that a single, well-prepared sheet could deliver both rigidity and flexibility, supporting a practical grid of hooks without the need for extra boards. We mapped tool weight paths, considered reach from a seated bench, and calculated hole spacing against a broad range of common hand tools we keep at hand. Edge treatment, mounting plan, and a deliberate rounding of corners mattered as much as the grid itself, since real life delivers knocks, spills and seasonal humidity. The process required templates, backer supports, and a constant eye on waste, so we could keep the workshop tidy and predictable. By the end, the wall did not feel like a gimmick but a calm, adaptable collaborator that stays in rhythm with the bench and the projects that arrive.
Planning the sheet into a pegboard wall
From the outset we treated the sheet as both material and map, sketching the peg grid before a single cut. We selected an 1220 by 2440 millimetre birch sheet, 18 millimetres thick, to balance stiffness with manageability. We left a 5 millimetre margin around the edge to allow a neat reveal when mounted. We settled on 32 millimetre peg spacing to suit European hooks and to keep lines calm. A single sheet would require careful kerf accounting and deliberate edge preparation to avoid waste. The plan was to keep the process precise so assembly would feel effortless on the wall.
To translate plan to the shop floor we printed a compact template and traced every point on the grain with a light pencil. We confirmed clearances against stud centres and avoided crowding near the panel edge. We rehearsed a dry run with cardboard templates to check reach and balance. This planning phase reduced surprises once we started cutting and routing. We recorded adjustments in a small notebook to stay honest about waste. The process reinforced that preparation saves time and materials.
Edge finishing mattered as much as the grid itself, so we earmarked a small bevel along the outer edge. We set aside kerf allowances so the peg positions would land where expected. We marked starting points using a square and a pencil for precision, then double-checked with a second measurement. We accounted for potential expansion due to humidity by leaving small gaps at the panel perimeter when mounted. We tested a few hooks on offcuts to see how they seat against the painted or finished edge. The panel remained rigid and true across a two-millimetre tolerance thanks to careful clamping during finishing.
 Save
Save
Cutting and shaping the panel
Cutting the panel demanded patient control; the sheet needed to stay flat and predictable throughout the operation. We set the track saw to the exact 18 millimetre thickness squared to true the edge. Clamps and cauls kept the sheet steady as long cuts followed the plan. We routed a gentle bevel along the outer edge to ease hook insertion, and to soften the overall silhouette. A quick wipe with mineral spirits checked the surface before finishing. We kept dust down by working with a light cut and steady pace.
Sanding progressed through 120, 180, then 220 grit to a silky finish, taking care to avoid cross-grain scratches. We tested a water-based polyurethane on an offcut to judge depth, tone and resistance to wiping. A matte finish limited glare and masked minor dust in a busy workshop. Between coats we dried in a well-ventilated corner and kept dust at bay. When the final coat cured the panel gleamed softly and felt robust to touch. We stood back to assess whether the sheen would reflect indoor lighting in a useful way rather than create glare.
Edge bevels were sharpened by hand to a uniform 1.5 millimetres, and those small chamfers paid off in daily use. We configured a back-cut sample at the edge to ensure a neat transition where the board would meet the wall. The surface took a light wipe of mineral spirits pre-finish to remove dust. We tested a few hook types on offcuts to see how they seat against the painted or finished edge. We finalised edge tolerances and confirmed there was no tendency for the board to catch on clothing or tools. The process affirmed that careful edge handling reduces wear on both tool and wall.
Transferring the peg pattern and drilling holes
 Save
Save
With the panel shaped and sealed, we moved on to transferring the peg pattern and drilling holes. We checked centering against stud references and the tools we planned to store near the middle. We aligned the template with a laser level, ensuring verticals read true from bench height to the top edge. We verified hole depth so pegs would seat reliably without bottoming out. We rotated groups of hooks on offcuts to test balance and reach, refining irregularities in the grid as needed. These checks formed the backbone of a dependable layout that could be reconfigured later with confidence.
The template was refined to preserve balance as projects evolved. We documented the coordinates to simplify future reconfigurations. This evidence reassured us that changes would be quick and precise. We kept spare offcuts on the bench to mock up ideas before committing. We used a second measurement cross-check to catch any drift and avoided relying on a single reference. The process added a quiet discipline that saved time when conflicts with tools arose.
Finally we reviewed edge finish to ensure daily use would feel comfortable. A slightly rounded edge reduced pinch points and made wiping easier. The panel held its shape and stayed plumb after minor adjustments. We noted screw positions so future tweaks would remain gentle and reversible. We checked the peg depth and peg heads to avoid accidents when removing tools. The grid integrity gave us confidence that the wall would perform under routine workshop load.
Mounting and future-proofing the wall
We prepared the wall for mounting using a French-cleat system to distribute load across multiple studs. Timber rails formed a clean backstop and kept the birch panel flat for maintenance. We used 45 mm screws with a 10 mm air gap behind the panel to accommodate movement. Alignment was checked with a spirit level to ensure the top edge read true. We verified the cleat alignment first with a dry-run before any permanent fixing. The plan combined rigidity with the ability to adjust as use patterns changed over time.
 Save
Save
Heavier items were placed near elbow height; we kept the heavier tools lower into the frame. The spacing allowed expansion and future reconfiguration, with templates ready. We left room for extra hooks and spare offcuts for quick mockups. We tested the system by loading growing sets of hand planes, screwdrivers, mallets and tapes to ensure nothing shifted undesirably. We documented the load path so later adjustments would be guided by actual practice rather than theory. The moment that hammer handle settled into its slot felt like a small triumph of planning.
We prepared a post-mount check to observe any warping or creeping after a few weeks of humid weather. When the panel was fixed, we revisited edge tolerances and confirmed there was no visible rattling or loose fasteners. We updated our notes to include practical tips from real use, such as repositioning blocks of hooks after heavy tasks. The result felt integrated with the bench, not a separate accessory. We could re-arrange sections without removing the board from the wall. The process underscored that future-proofing comes from modular details rather than bold, one-off features.
“Planning with your hands transforms a plan into practice.” — Mira
- Plan the peg grid with 32 mm spacing to fit European hooks.
- Leave at least 5 mm clearance from the edges for milling tolerances.
- Mark starting points using a square and a pencil for accuracy.
- Test a few hooks on offcuts before committing to the wall.
How to do it
Prepare the birch plywood sheet
We sourced a single 1220 x 2440 mm sheet, 18 mm thick, and checked for flatness with a straightedge before starting; we planned the cut list, including kerf allowances and edge trimming. We set up a clean, uncluttered workspace with a sacrificial backer board, clamps, and a small spirit level to confirm square.
Cut and smooth the panel
We cut along the plan with a track saw, routed bevels along the outer edge, and sanded through 120, 180, then 220 grit to a silky finish. We finished with a water-based polyurethane, applying several thin coats with light sanding between applications.
Transfer peg pattern and drill holes
We transferred the grid using a template, marked hole centres with a pencil, and cross-checked with two measurements to guard against drift. We drilled with brad-point bits and used a stop block on the drill press to maintain uniform depth; we then vacuumed and wiped as we progressed.
Mount and finalise
We mounted the panel on a French-cleat system into sturdy studs, tested load balance, and corrected any misalignment before finalising edge tolerances. We filled gaps behind the panel with spacers to reduce rattling and ensured hooks aligned with the grid before a final test project.
Frequently asked
What thickness and dimensions did you use for the plywood?
What peg spacing did you choose?
What finish did you apply to the birch panel?
How did you mount the panel to the wall?
How much weight can the pegboard safely hold?
How can I reconfigure the layout later?
How should I maintain the wall over time?
In closing
Building this pegboard wall from a single birch sheet forced us to think about how people actually work in a small workshop. It is not merely a storage solution; it is a process, a line of ongoing adjustments, and a record of how we move from plan to practice. By treating the sheet as both construction material and layout blueprint, we saved waste and refined our routine. Load paths, edge finishing, and mounting methods mattered as much as the hooks themselves. Ultimately the result is a calm, adaptable boundary on chaos, not a fixed system. We learned that patience, measurement, and hands-on testing turn a single sheet into a reliable workshop collaborator.