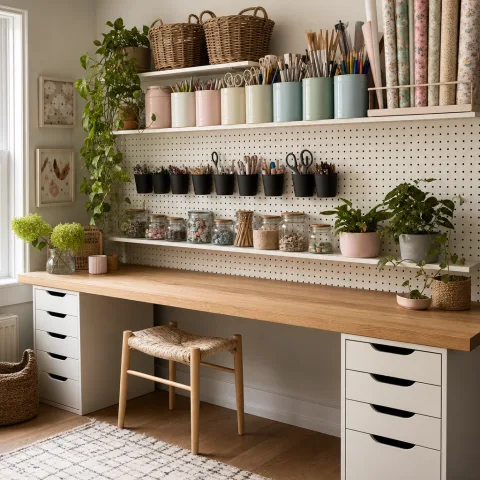
We did not need more storage. We needed our existing tools to stop colonising the only flat surface in the room. For most of two years the workbench had been a slow tide of chisels, a block plane, three tape measures and whatever sandpaper was open at the time. Every project began with twenty minutes of clearing before any actual work could start, which is the quiet way a workshop stops being used at all. The fix we kept circling back to was the french cleat: a length of timber ripped at an angle so one half hooks over the other, letting anything hang from the wall and lift straight off again. It is an old shop idea, nothing clever, but it solves the exact problem we had, which was not capacity but retrieval and return. So one Saturday we cleared the wall above the bench, cut a sheet of birch ply into strips, and built a system where every tool has a home it can reach in a second and be returned to just as fast. By the evening the bench was bare for the first time since we moved in, and it has stayed that way since.
Why the cleat beat every other system
We had tried the obvious things first. Pegboard went up in the old flat and we hated it within a month: the hooks wandered, fell out when you lifted a tool, and the holes dictated where things could live rather than the other way round. Slatwall was the next temptation, but the aluminium track was dear and locked us into proprietary fittings. A french cleat asks for none of that. It is just two strips of ply with matching 30-degree edges, and gravity does the holding. Once the wall strips are level, anything you can screw a back-cleat to becomes a hanger.
The deeper appeal is that it is endlessly editable. A pegboard hole is fixed forever; a cleat holder can be unhooked, modified, or rebuilt in five minutes without touching the wall. As our work changes through the year, the wall changes with it. In winter the hand tools cluster near the bench; in summer the garden secateurs and twine migrate to the end nearest the door. Nothing is permanent, and that turns out to be the whole point of a tool wall you will actually keep tidy.
 Save
Save
Setting the wall cleats dead level
The single thing that makes or breaks this build is the wall cleats running true. We ripped four 2.1m strips at 30 degrees, then found the studs with a magnet and a knock test rather than trusting the cheap detector. The top cleat went on first with a long spirit level, glued and screwed into every stud we could reach, bevel facing up and outward so a holder drops onto it. Everything below references that line.
We spaced the remaining cleats 200mm apart using a hardboard offcut cut to that exact height, so each one sat parallel without re-measuring. The lowest cleat we deliberately kept 200mm above the bench surface, which leaves room for clamp heads and longer holders to hang without crashing into the worktop. It took longer to get the first cleat right than to fit the other three combined. That is normal, and worth the patience.
 Save
Save
“We stopped tidying the bench because the wall does it for us now.” — Theo
Hand-cutting hooks for the tools we own
The holders are where a generic system becomes yours. Rather than buy hooks, we cut them to fit specific tools: a cradle for the block plane so it sits on its side off the blade, a slotted rack for chisels in order of width, a deep U for the cordless drill, and simple dowel pegs for tapes and squares. Each holder is just a back-cleat ripped at the matching angle, with a face piece glued on. Nothing took more than ten minutes once the angle was set.
We resisted the urge to fill the wall on day one. Tools that earn their place over a fortnight get a permanent holder; everything else lives in a single catch-all box until it proves it belongs. This stops the wall becoming a museum of things we never reach for. The bare patches are not unfinished, they are room to grow, and they keep the wall honest about what we actually use.
- One holder per tool, shaped to how the tool rests safely.
- Order chisels and drivers by size so a gap signals a missing one.
- Leave 30 percent of the wall empty for whatever next month needs.
- Sand and oil the hooks so tools slide on and off without snagging.
How to do it
Rip all the cleats in one go
Set the saw to 30 degrees and rip the wall strips and a stack of holder blanks in a single session. Keeping the fence untouched guarantees every bevel matches, which is the only tolerance that really matters here.

Fit the top cleat true and level
Find the studs, then glue and screw the top cleat dead level with the bevel facing up and out. Take your time; every other cleat and holder inherits whatever this one does, good or bad.
Space the rest with a gauge
Use a cut-to-size offcut as a spacer between cleats so you never measure twice. Keep the lowest cleat at least 200mm above the bench so clamps and tall holders hang clear of the worktop.
Build holders to fit the tools
Cut a back-cleat for each tool and add a cradle, slot or peg shaped to how that tool wants to sit. Sand and oil each one, then hang it, load it, and adjust until the tool comes off in a single easy movement.
Common mistakes to avoid
Trusting the stud detector alone
Our cheap detector lied twice and we nearly screwed two cleats into bare plaster. A magnet to find the screw line and a knuckle knock to confirm the solid sound saved us from a holder pulling out under a loaded drill.
Mixing bevel angles
We cut a second batch of holders on another day and forgot to reset the fence precisely. Those holders rocked instead of seating flush. Mark the saw setting and cut everything from it, or expect to recut.
Filling the wall too fast
On the first afternoon we hung everything we owned, then spent a week reaching past tools we never use. Start sparse, let the genuinely used tools claim space, and box the rest until they earn a holder.
Frequently asked
What angle should the cleats be cut at?
Will plywood cleats hold heavy tools?
Do I need a table saw for this?
How far apart should the wall cleats be?
Can I do this on a plasterboard wall with no studs in reach?
How do I stop tools rattling or slipping off?
Is this worth it for a very small workshop?
In closing
What surprised us was not the storage but the behaviour change. We expected a neater wall; what we got was a workshop that resets itself. Because returning a chisel to its slot is now genuinely faster than dropping it on the bench, the bench stays clear without any discipline on our part, and a clear bench is one we actually start projects on. The wall cost a sheet of ply and an afternoon, and it has paid that back every single time we have walked in, picked up a tool, and put it back without thinking. If you only build one thing this year, build the thing that makes tidying disappear.