The curtain rod came down before I finished the second cup of tea. It wasn’t dramatic: two screws, a bracket that surprised me with how much dust it had been hiding, and a quiet sense that the top of the window had been left to its own devices for years. We painted the rod a deep, muted green — the sort of colour that reads like a crown rather than a stripe — and when it went back up we raised it three centimetres. Ninety minutes later the room felt different in the same way a small haircut changes a face. The proportions settled. The curtains stopped looking as if they were waiting for permission. This is not a trick of lighting; it’s the slow arithmetic of material and line. Below I explain the thinking, the mistakes, the tools, and the exact little alignment habit that made the difference for us, with notes for people living in rentals and for anyone who prefers a single modest fix to a heavy renovation.
Why three centimetres matter
Proportion is an impatient thing. A ceiling line three centimetres higher is not a structural miracle; it is visual currency. The eye measures the room in bands: ceiling, wall, window, floor. Lowering the perceived top of that band with a dark horizontal weight — a rod painted near-black green — changes the ratios. The wall reads taller because the eye is no longer asked to stop at a metallic grey bar about eye level. Instead it is invited to travel a little farther. The effect is cumulative: curtains that hang from a slightly higher point skim the floor differently, furniture anchors read with a little more breathing room, and corners that used to look crowded suddenly look edited. It is astonishing how much quiet elegance can be coaxed out of a centimeter or three; it is not magic, just economy.
There is also a psychological change. A higher rod alters where the eye expects the top of things to be. In our flat, which has ceilings that are generous for a 740-square-foot rental but not cathedral-scale, the small lift made the whole room feel deliberate rather than accidentally arranged. That deliberateness matters because interiors are, at their best, argument pieces: a chair says, ‘sit’; a lamp says, ‘read’; a framed print says, ‘this matters.’ The rod saying, ‘this is intentional’ is quietly persuasive. The lesson here is that proportion you can tweak matters more than the items you cannot: it is easier to make a window look tall than to buy a taller couch.
Ceiling line and optical tricks
An upward shift is an optical trick with honest intentions. Architects use crown moulding, but the simpler option is to increase the visual gap between the top of the curtain and the ceiling. Raising the rod makes the curtains appear anchored by the ceiling rather than the window frame — the implied ceiling-to-floor band widens. Our curtain fabric hangs flatter when supported from higher; the folds are longer, and the eye reads the window as a positive vertical feature rather than a box that interrupts wall space. Because the change is minimal to the hardware, the room retains its character but gains a more composed posture. It’s the interior equivalent of improving posture: small, uncomfortable at first, curiously better afterward.
How small moves have outsized effects
The broader idea is one embraced by people who prefer making to buying: a tiny intervention recalibrates everything else. We have spent weekends replacing lamps, changing rugs, and rearranging chairs; those things helped, but the painted rod created a mood quicker than anything else because it altered the frame within which other objects live. It is also inexpensive and reversible. For anyone suspicious of wholesale redecorating, this is the sort of domestic minor surgery that pays compound interest: each morning the room reads as though it had been designed with more time and care than it actually received.
Choosing the dark green
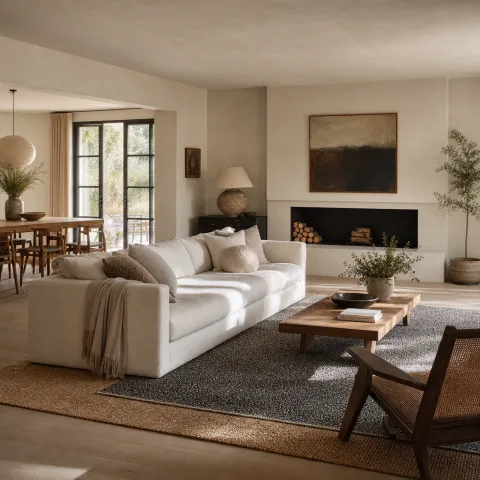
We did not choose green because green is fashionable. The decision came from a specific observation: the white plaster of our living room reads cool in Lisbon’s north light, and a warm or ochre rod would compete with the floor and the teak side table. A deep, slightly greyed green acts like a soft frame; from a few metres it reads almost black, but in sunlight the undertones come through, and that gives the room a modest generosity. Choosing a pigment is not a pure aesthetic choice; it is a negotiation with light, wood, and the existing palette. The green we used has a touch of black and a whisper of blue so that it reads sober with an undertow of colour. It calms rather than commands.
The finish matters more than imagined. A satin or low-sheen matte keeps reflections to a minimum and appears more architectural than a glossy coat, which reads like an afterthought. We used automotive spray paint for durability on the metal rod, then softened the finish with a single brushed layer of a chalky matte in the same tone to reduce shine. That hybrid approach produced a tactile, brushed look that photographs well without catching every glare. For people living in rentals, a simple matte enamel from a hardware store will do; the key is to avoid obvious gloss and to test the colour in the space before doing a full coat.
Paint type and finish
Metal rods benefit from primers designed for ferrous surfaces and paints intended for prolonged handling. A metal etch primer takes rust and adhesion seriously; it is cheap insurance. For the topcoat, a waterborne acrylic enamel in a low sheen works well. The kind of paint that resists fingerprints and stands up to occasional curtain friction is worth the extra euro. It’s not necessary to overfinish: we aimed for texture and restraint, not a perfect industrial sheen. If the rod will be exposed to humid conditions, choosing a paint labelled for metal and moisture is a small preventative step that avoids future irritation.
Testing the colour and hardware first
We always make a small test object. For this project the first coat went on a discarded curtain finial and a spare length of metal pipe; we taped them to the window ledge and watched the colour change as sun moved across the room. It revealed undertones the swatch missed. The hardware test is about scale — the paint looks good on a tiny chip but can change when brushed across a metre of rod. If there is any doubt, paint a short length and live with it for a day. Paint behaves differently near a window where light and temperature vary; patience here beats an impulsive recoating.
 Save
Save
How we did it in 90 minutes
The work was quicker than expected because the plan was minimal and the tools few. We removed the curtains, unscrewed the brackets, and took the whole rod to the balcony for sanding and a light wash. While it dried, a coat of primer, then a topcoat. Back in the room we measured fresh bracket positions three centimetres higher than the originals, marked the wall, and used a spirit level to keep the run perfectly horizontal. The only tricky moment was drilling into lime-plastered walls; a slow hand and masonry bits helped. Reattaching the rod felt almost ceremonial — the weight came back to the wall and the curtains readjusted like a pair of trousers after a belt fix. Ninety minutes is not show-off speed; it is careful, efficient doing.
Timing is about sequencing rather than rushing. We began with the removing step so the primer could cure while we made the new marks on the wall. The sanding was light — just enough to dull shiny factory finishes so paint would bite — and we handled edges with a small artist’s brush to avoid runs. When drilling we set the drill’s clutch to low to avoid punching through old plaster shells; patience prevents cracks. The majority of the ninety minutes is in small disciplined moments: waiting for a coat to tack, checking a level twice, wiping a smudge before it cures. Those are the pauses that keep a small job from becoming a messy one.
Tools we used
A basic toolkit was enough: cordless drill with masonry bits, spirit level, tape measure, pencil, small sanding block, 120-180 grit, a tin of metal primer, a tin of matte topcoat, a disposable brush and a small foam roller for touch-ups, plus an old rag. The hollow-wall anchors were bought after we checked the bracket holes weren’t near a stud; a couple of screw-in plugs provided secure holding without oversized damage. We carried a cheap plastic tray outside to avoid drips on the balcony rail and used a cardboard box as a makeshift drying rack. The less fuss with tools, the more the task felt like domestic care rather than a building job.
A mistake we made (and how it was fixed)
We initially marked the new bracket holes by measuring up from the top of the window frame rather than from the ceiling line. That left the rod uneven on one side because the window frame had a slight lean from an earlier settling. The fix was simple and patient: we remeasured, this time taking a single datum point from the ceiling plaster a couple of centimetres inboard from each bracket, transferred that horizontal line across with a long spirit level, and re-drilled. The moral is that small old buildings have character; using the ceiling as a reference, not the window, gives a more consistent visual result.
 Save
Save
The small alignment trick that makes everything look deliberate
The alignment trick is modest: measure and mark the bracket positions relative to the ceiling rather than the window, then place the inner edge of the rod’s bracket three centimetres higher than the original. The extra lift is barely audible to the occupant but it lets the curtain hang with a slightly longer drop, which our eyes read as calmer. Small, consistent offsets matter more than absolute symmetry. In our case one bracket was originally a finger-width off; when reinstalled at the new height and aligned with a single level line, the whole run read as one resolved gesture instead of a collection of patched decisions. Consider brackets as punctuation: one crooked comma and the sentence stumbles.
The measuring technique is old-fashioned but effective. We used a long spirit level and a pencil to transfer a line from one ceiling corner to another, then measured down an equal distance at each bracket point rather than measuring up from the window frame. The reason is practical: windows settle; ceilings, less so. If the plaster is lumpy or the cornice irregular, use multiple datum points and strike a straight line using a chalked string or laser level. The small labour saves an afternoon of recentering and a tendency to blame the curtains for being misbehaving when it is the hanging line that is at fault.
Centering versus compositional offset
A tempting habit is to center the rod exactly over the window’s midpoint. That can work when everything else in the room aligns symmetrically, but it often looks like an attempt at perfection in an imperfect building. Instead, think compositionally: if the sofa sits slightly to one side or a picture is offset, allow the curtain rod to sit within that domestic composition. In our flat we nudged the rod a few millimetres so it read in agreement with a side table; the effect is more relaxed and deliberate, not sloppy. Good interior moves are conversational, not bureaucratic.
Leveling without fuss
A 600mm spirit level is patient enough for most domestic curtain runs; a laser level speeds things but can encourage haste. Strike a faint pencil line as your anchor and check both ends twice before drilling. If the wall is soft plaster, drill shallow pilot holes and use the correct wall plugs: toggle anchors for hollow spaces and nylon plugs for solid lime. After the screws are sunk, test the rod loaded with the curtains before tightening everything down to ensure even load distribution. The trick is not to aim for invisible hardware; the trick is to make visible hardware look as if it was never an afterthought.
 Save
Save
For renters: how to make it reversible and harmless
Rented homes demand a different temperament. There was a moment when the idea of drilling new holes felt like a betrayal — to the landlord, to the tenancy contract, and to the plaster. But the reality is that careful work, the right anchors, and a tidy patching plan make changes reversible and even tasteful. We kept the original screws and brackets in a labelled envelope. After we moved the rod up, we filled the old holes with a colour-matched filler and smoothed the patches in an afternoon; the repair was subtle enough to pass inspection. Reversibility is both practical and ethical: every small change should be unmaking-friendly.
The right plugs and minimal hole size make a big difference. For solid plaster walls we used nylon plugs sized to the screw; for hollow sections we used toggle anchors that distribute load without cracking plaster. If there is concern about the landlord’s permission, an adhesive curtain track is a perfectly respectable alternative for lightweight curtains, although it sacrifices the stability of metal brackets. We avoided adhesive tracks because ours needed to hold heavy linen, but for sheer panels or short curtains they are a clean, noninvasive compromise.
What to keep in a repair kit
- Original screws and brackets in a labelled envelope
- A small tub of matching filler and a finishing spatula
- Fine-grit sandpaper and a touch-up paint sample
- Spare wall plugs compatible with the original fixings
A quick kit is what we pack for any small reversible intervention. If the tenancy ends, the envelope of hardware and the patch kit are handed to the landlord with a brief note. Often they are surprised by how little evidence is left when repairs are done patiently. It is a small courtesy and a good domestic habit: treat the apartment as a place you will one day politely leave in better condition than you found it.
 Save
Save
Why we wouldn’t go back
There is a risk to small changes: they can look like affectation if done for show. The green rod avoided that because it reads as utility first, ornament second; it frames rather than shouts. The higher rod has made everyday actions different — closing curtains after dinner feels more like a concluding gesture than an afterthought. These are small domestic rituals but they shape how a place is used. If the home is the set for a life rather than a showroom, small acts that support everydayness are the most honest sort of design. For that reason we see the painted, raised rod as a change in habit as much as a change in hardware.
On the practical side, the painted rod has worn well. Fingers brushing the metal leave no glaring marks; the paint has a forgiving personality, hiding the small scuffs that come with daily use. The three-centimetre lift also made a surprising difference for light control: curtains now meet the floor in a way that seals the bottom of the room visually, reducing the feeling that the window is a hole in the wall. The mood of the room felt calmed not by hiding things, but by giving them a soft edge and a tidy frame. It’s a particular kind of domestic humility that we have grown fond of.
A quieter frame for furniture
The raised rod made furniture placement read better; it is as if the room has a faint scaffolding that organizes things. The sofa no longer competes for vertical attention and the wall behind it breathes. Furniture relationships are often about negative space — the gaps as much as the objects — and the new rod quietly enforces a little more negative space near the ceiling, which makes each piece feel considered. The change is not theatrical. It is the kind of improvement that goes unnoticed until someone comments, 'this feels calm.' That is the highest compliment for a small domestic intervention.
Why temperament beats trend
Trends are loud; temperament is a quiet thread. We chose restraint because our life in this apartment is ordinary and ongoing, not staged for seasonal attention. The rod’s colour and placement now act as a bookend to the room’s palette, steadying brighter textiles and occasional ceramics. It is not a statement piece so much as a steadying device. When small decisions are made with the habits of the household in mind, they last beyond the fashion cycle. That is why we would not undo this one: it is part of how the apartment now wants to be lived in.
“A small adjustment to the frame changes the sentence the room is trying to say.” — mira-aslani
How to do it
Remove the curtains and take down the rod
Unhook the curtains, unscrew the finials and brackets, and remove the rod so it can be cleaned and painted outdoors or in a well-ventilated area. Keep all screws and mountings together in a labelled envelope.
Prepare and paint the rod
Lightly sand the metal, apply an etch primer, then one or two thin coats of the chosen matte topcoat, allowing adequate drying time between coats.
Measure and mark new bracket positions
Transfer a level line using the ceiling as the datum, mark bracket locations three centimetres higher than previous holes, and double-check the horizontal run before drilling.
Install brackets and rehang curtains
Use appropriate wall plugs for the wall type, fix the brackets, test with the curtain weight, then tighten and replace finials for a tidy finish.
Frequently asked
Will drilling new holes damage plaster walls?
Is a painted rod durable under regular use?
Can this be done without drilling for renters?
Will raising the rod cause the curtains to drag on the floor?
In closing
We rarely keep things the exact same twice. There is a stubborn pleasure in doing less and feeling more: a painted rod, a few millimetres of lift, a pair of brackets nudged into polite alignment. After ninety minutes the room asked for nothing more than daily use. The green above the window now performs the work of a light crown, tempering the glare, reading as deliberate rather than decorative. That small decision — to move the line where wall meets fabric — became a rule of thumb for us. When something in the room feels loud or hesitant, consider lifting the head of it a touch and giving it a quieter colour to wear. It is an act of modesty that changes temperament, and temperament is the thing a place remembers long after trends have left.