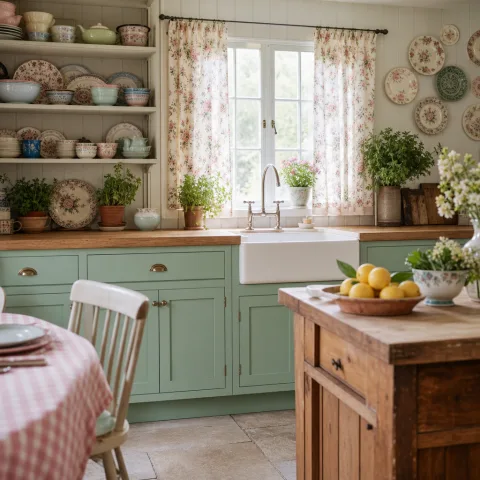
The first thing anyone notices in our kitchen is the gap between the fridge and the wall: a measured 5 centimetres where an appliance shouldn’t be allowed the dignity of a margin. We moved the little white fridge in like a small apology and left it there while we worked — sanding cabinet doors at the sink, painting a single patch of wall with limewash on a Saturday afternoon, wrestling a pendant light free from old wiring. The room felt like a series of small acts rather than a project. Each season we added one thing we could live with and one thing we learned to live without. Over the year the kitchen stopped shouting that it was a rental and began to whisper that it had a life.
A kitchen that unfolded like a season
We did the work in episodes: a spring of sanding, a summer of light, an autumn of small cabinet fixes, a winter for textiles, and a quiet following spring for plants. Each episode was driven by a single irritant — a sticky drawer, a pendant that hummed, a paint so glossy it reflected everything badly — and a decision to attempt a repair rather than tile over the problem. There is a certain humility to this approach: it assumes the apartment will outlast our short-lived enthusiasms and that small repairs are less likely to be punished at checkout. The table that sits in the middle of the room is dented and crooked; it survived because we refused the easy route of replacement and learned a few joinery repairs in the process.
What surprised us was how much personality the kitchen showed as the seasons changed. A wall that felt unnoticeable in winter read as the room’s central face when the late sun hit it in May. The narrow fridge — an object we bought out of necessity because a full-size model wouldn’t fit the doorway — began as a compromise and ended as an opinion. These are not heroic decisions; they are choices a person makes when there is a hard limit on space, money and landlord patience. But little choices accumulate into character in the same way that a few well-placed scratches tell you a table has been used.
Why a calendar mattered more than a budget
Early on we set weekly appointments with ourselves: two hours after work on Wednesdays, a Saturday morning, and a longer Sunday chore hour. We tracked progress not by a spreadsheet of costs but by a calendar of decisions — which paint to buy, which pair of hinges would be replaced, whether to try limewash on a test patch. That cadence mattered because it kept the work domestic rather than heroic. We could stop, live in the room, notice how things wore, and then return to fix a problem with a clearer idea of whether it truly needed fixing. A modest budget kept us resourceful; a strict timetable kept us sane.
The landlord and the limits of permission
We asked permission for the limewash and for rewiring the pendant; we did not ask for permission to sand off decades of paint from the cupboard doors. There is a moral economy to living in a rental: some changes require the landlord’s blessing, others are quietly reversible. We tried to keep everything reversible — doors that could be reattached, repairs that could be undone with a screwdriver — so the apartment retained value. That constraint is a creative stimulant, not a handicap. It makes you think twice about which decisions should be permanent and which are experiments. It also taught us to document the work: photographs, short notes about paint mixes and hinge sizes, which turned out to be useful when the new washing machine famously demanded a different hose connector.
Sanding the cabinet doors until they felt right
The cabinet doors were our first major, hands‑on task. They had been painted a factory white that held onto grease in a way paint should not; the edges had been nicked, and the knobs were a decade out of date. Rather than replace the doors we stripped and sanded them, revealing a banded grain that suggested they had once been a pleasant oak. The process was slow: coarse paper to remove the worst of the paint, a mid‑grit for flattening, then a fine finish hand‑sanding to coax the grain back. We wore masks inside, took the doors outside on the balcony when the weather allowed, and learned the peculiar satisfaction of a hinge that no longer squeaked.
A few practical notes that made the sanding bearable: take photographs of each door and its hinge positions before you remove anything, label each hinge with a piece of masking tape, and always sand with the grain. We tried an orbital sander for a couple of doors and ended up preferring the control of hand‑sanding for the ones with routed profiles; the orbital removed paint fast but left a softened edge that felt too anonymous for the kitchen’s modest scale. The whole job took three weekends for two of us — not because the work was difficult but because we kept stopping to test stains and feel whether the surface was honest rather than overworked.
Choosing finish: oil, wax or clear lacquer
We debated finishes for weeks. Oil gives a lived-in warmth and is easy to patch; wax is forgiving and soft to the touch; lacquer gives a durable, wipeable surface but feels like a factory finish. We chose a thin oil first, applied with a rag in small batches, and later added a light coat of paste wax on edges that took the most knocks. This combo kept the doors looking natural and allowed for small spot repairs. The visible joints and the tiny chips near the handle still read as evidence of use, which is precisely the point: we wanted the kitchen to feel used, not broken, and finish choices influence how wear looks over years.
 Save
Save
The pendant: rewiring and keeping a favourite lamp
The pendant that hung over the sink was the reason we took the wiring course. Its cord had been tied off clumsily, the bulb flickered, and the cover plate was the wrong size. We didn't plan to become electricians, but we needed the room to be safe and the light to be steady. After a short weekend class and a lot of cautious measuring, we replaced the old pendant wiring with a new cable, fitted a proper ceiling cup, and added a small inline switch on the cord so the fixture could be turned on at counter height. The result is modest and domestic: warm light over the sink, no buzzing, and a pendant that looks like it belongs there because its fittings are honest.
Safety first, then aesthetics
A trustworthy electrician will always be needed for major rewiring; our changes were limited to swapping a pendant in the ceiling rose and replacing a damaged flex. We shut power at the breaker, tested for current, and used rated connectors. The point of doing this ourselves was not to save money so much as to learn the little rules: how much slack to leave in the canopy, how to anchor the cord so it doesn't pull on a terminal, which gauge of wire to use for a single pendant. Those details make the difference between a half‑baked fix and a permanent, tidy repair.
A tiny, essentially decorative change — fitting a brass shade we had found at a flea market — read differently once the wiring was right. The light now has a steady pool of warm illumination over the counter in the evenings. The fixture is the sort of object that could have read as a costume piece if the wiring had been left shabby; instead it anchors the corner because it works and because its details are honest. The cost was small in parts and the learning was large in confidence.
One limewashed wall and how light rearranged itself
Painting the whole kitchen was never tempting; instead we picked a single wall — the one opposite the window — and limewashed it. Limewash is forgiving on imperfect plaster, breathes with the old masonry, and in our light gives a softness that conventional emulsion could not. We tested colour patches in shadow and sun, watched the samples as the day progressed, and chose a muted warm grey with a faint green undertone. The application was a weekend job: two thin coats, brushed on and gently stippled in places to keep the surface interesting rather than flat.
Why limewash, not regular paint
Limewash doesn’t sit on the surface in the same way latex paint does; it integrates with the plaster and mutters rather than shouts. In a rental that felt important — the finish reads as part of the building, not an applied skin. It is also easier to touch up invisibly: small scrapes can be brushed in and the patina will settle. There are downsides: limewash is matte, picks up smudges more easily, and requires different cleaning habits. We accepted those trade-offs because the room’s light needed something that reflected warmth back into the kitchen rather than creating another bright, clinical surface.
 Save
Save
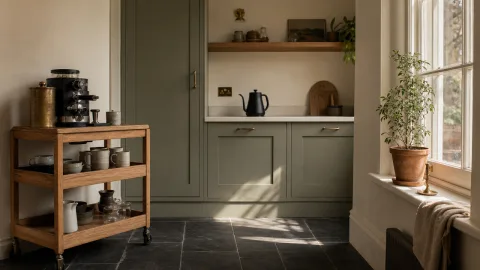
The 50 cm fridge and the art of compromise
At first the narrow fridge felt like an embarrassment. It looked like a temporary student appliance and, in a culture that assumes a tall fridge is a mark of seriousness, it carried a weight of perceived scarcity. Practically, it required learning to shop differently: smaller quantities, more frequent market trips, an acceptance that leftovers needed to be planned. Socially, it imposed a new rhythm to cooking; we began to think in components rather than full-menu ambitions. Over time it revealed itself as a liberating constraint — less food waste, fresher ingredients, and a fridge that fit the room rather than fought it.
Storage strategies that aren’t heroic
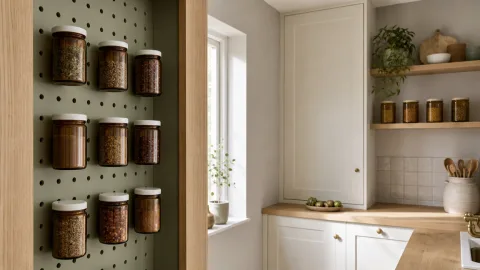
We adopted a few low-effort storage decisions that made the refrigerator and cabinets perform better: a narrow slide-out crate for soft produce near the fridge, a single deep pan drawer under the hob for everyday pans, and open shelving for plates so we could see what we had. We stopped buying weirdly sized plastic containers and instead used jars and canvas bags that fold and disappear when empty. The principle is simple: prefer visible storage for frequently used items and deep, hidden storage for less-used things. Visibility reduces the impulse to overbuy and keeps the small fridge from becoming a black box.
- Keep one shelf bare for vegetables and fruit — rotation is easier when there’s space.
- Use clear jars for grains and pulses; they stack better than mismatched boxes.
- Adopt a weekly market day to keep stock light and fresh.
Six small joinery choices that mattered most
We didn’t install new carcasses or rip out counters; instead we focused on six modest joinery choices that changed how the kitchen behaved. Recutting a misaligned mortice on a cabinet hinge made doors sit flush. Replacing a bowed drawer runner with a simple guide made drawers slide like new. Adding a small strips of felt to cupboard doors softened the closing sound and introduced a tactile quality that felt expensive. Each of these changes cost little but changed the way the kitchen responded daily. In small spaces, interaction matters: a door that closes cleanly is disproportionately satisfying.
The six items
Each item is small but cumulative. For instance, aligning handles across doors takes patience: we measured, hammered a thin jig from scrap ply, and redrilled holes so everything sat on a single horizontal line. The kitchen looks calmer because our eye isn’t interrupted by small misalignments. The drawer guide replacement was born from a drawer that always stuck with one pan inside: a simple pine strip, glued and screwed, made the difference. These repairs are also repairable and affordable — a drawer guide can be remade in an hour from offcuts and a glue line.
“Small mechanical fixes are how domestic spaces stop feeling like sets and start feeling like homes.” — Mira Aslani
Costs, time and the uncomfortable math
We kept a modest ledger. Sandpaper, oil and wax, new hinges, a specialist limewash bag, electrical cable and connectors, a handful of screws and a new seal for the fridge door: spread across a year, the totals weren’t dramatic. The uncomfortable part was the time investment. Labour is the hidden cost of doing things yourself: evenings and weekends spent sanding and watching paint dry, the patience of living with an open door on one night while a hinge cured the next. If one values time economically, hiring a tradesperson would have been faster, but in doing it ourselves we gained a set of small skills and a different relationship with the space. That tradeoff is personal and worth naming.
A rough breakdown feels useful: the limewash and consumables cost less than a single mid-range appliance, the sanding supplies and finish materials were modest, and the hardware replacements were cheap when bought from local suppliers rather than large chains. We paid for a short wiring workshop rather than entirely trusting ourselves, and that was money well spent. The most expensive part was learning: mistakes such as a botched test patch for the limewash and a stripped hinge screw taught us more than any single purchase ever could.
Mistakes worth remembering
Not everything worked. We tried to oil-stain one door too dark once, and the result read like an afterthought; it stayed in our test pile until we sanded it back the next month. We glued a small trim strip in a hurry and used the wrong adhesive; removing it later required a heat gun and patience. There are two lessons here that are not glamorous: test on spare parts, and accept that some experiments will cost both time and a little money. These failures are not shameful; they are an honest record of learning. We kept the discarded pieces in a box, partly for repair, partly as a catalogue of choices we didn’t want repeated.
A second, more subtle failure was impatience with scale. For a while we chased matching wood tones across the room and nearly replaced things to achieve a uniformity that would have made the kitchen less interesting. It is better, we learned, to pursue a quiet coherence — a repeated joinery detail or consistent hardware finish — than a sterile uniformity. The worn edge of a shelf or a slightly darker drawer is the sort of thing that gives confidence to the lived-in look.
Plants, textiles and the last finishing gestures
We left the final layer to textiles and plants. A linen towel over the rail, a small woven mat near the sink, and a low shelf of potted herbs near the window made the room feel lived-in in a way paint and hardware could not. Plants are acts of maintenance; keeping them happy forces routines such as watering and pruning that slow a room’s tempo into domestic steadiness. Textiles soften hard lines and hide small stains, which is useful when a rental’s paint is less than cooperative. These finishing gestures are cheap and reversible but often have the largest emotional return.
- Keep one fragrant herb (rosemary or basil) in a sunny jar.
- Rotate a single tea towel weekly so stains don’t feel permanent.
- Use woven baskets for onions and potatoes — they breathe better.
When guests began to comment on the kitchen — not on its appliances but on how calm it felt — we realised how small details add up. A consistent palette, a few plants, and the steady sound of a properly closing drawer mediate between the practical and the lovely. The room is not perfectly styled; plates are mismatched, the table carries knife marks, and the fridge door has a magnet with a child’s scrawl. Those things are part of the record of use and are, frankly, preferable to a perfectly staged space that never gets used.
How to do it
Remove and label cabinet doors
Unfasten each door and hinge, place a strip of masking tape on the back with its location noted, and store screws in labelled bags to make reassembly straightforward.

Strip paint and sand by hand
Use coarse paper to remove paint, then progress to finer grits, always sanding with the grain and testing a small area with finish to check the look.
Prepare and apply limewash
Mix limewash to manufacturer instructions, brush on two thin coats allowing ample drying time between, and gently sand any raised bits once cured for a soft, even surface.
Test and replace pendant wiring
Turn off power at the breaker, test the circuit, replace the pendant flex with rated wire and secure connections in a proper ceiling cup; hire an electrician if unsure.
Frequently asked
Is limewash suitable for a rental?
How long did sanding and finishing the doors take?
Did rewiring the pendant require an electrician?
How did you cope with storing more food with a smaller fridge?
In closing
When the work felt finished — and it never truly does — the rule that mattered most was this: small, thoughtful repairs add up to permission. We didn’t change the layout or replace the units; we changed the way the room reflects light and how the handles feel under our fingers. The limewashed wall reads differently at dawn than at dusk, the sanded doors close with a steadier sound, and the 50 cm fridge now feels proportionate because the surrounding decisions were made with restraint. If there is one concrete image I want to leave, it’s a cup on the counter in late light: the paint edge behind it, the tiny repaired chip on the cupboard frame, the glow from the pendant we rewired ourselves. Those details are the proof that living slowly — one sanding stroke, one plaster skim, one reattached hinge at a time — changes a place more durably than a flashy renovation ever could.