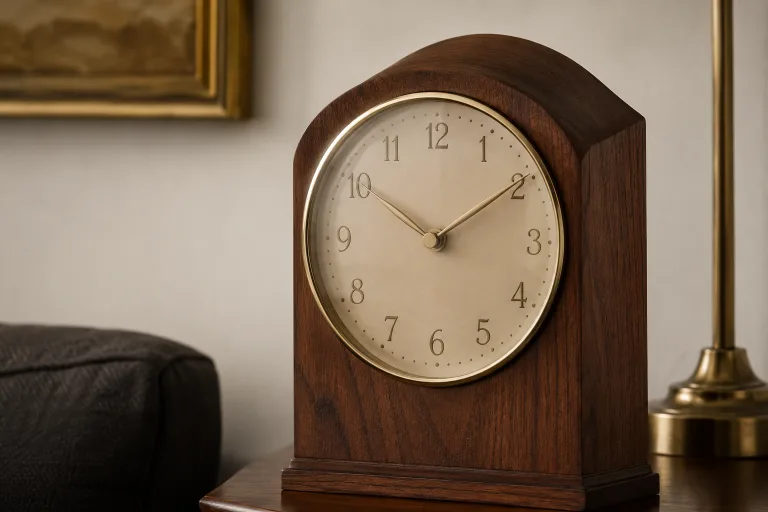
Over the crisp weekend, we approached the walnut clock with restraint and care. We documented its condition, tested the movement, and prepared a compact kit of essentials: mineral spirits, 0000 steel wool, shellac sanding sealer, linseed oil, and a natural varnish. We chose to repair and refine rather than replace, honouring the clock's original character. The work space remained a field studio, with soft daylight on a solid oak bench and shelves of patient tools. The clock's grain carries warm amber tones, guiding our finishing choices toward a satin, low-gloss result. By Sunday evening, we had a plan, clear components, and a clock that seemed ready to rejoin the room's rhythm.
Weekender restoration plan
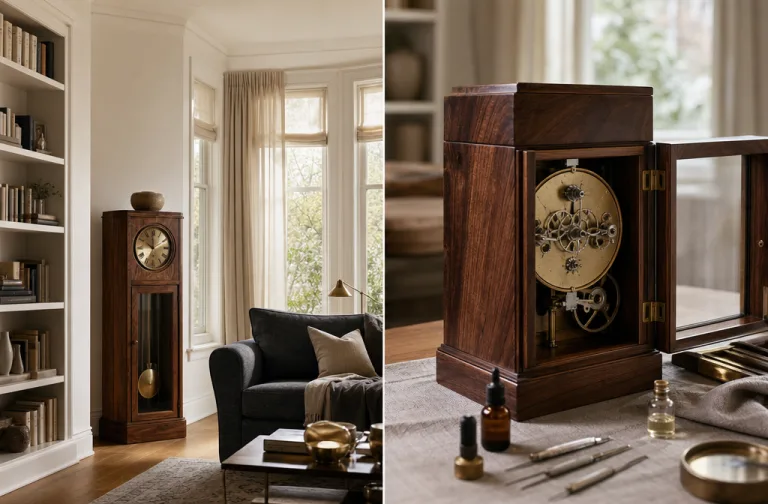
On Saturday we began with a careful assessment of the case, noting deeper scratches and a veneer lift at the left edge. The clock spoke to us through its small losses: a few chips, a slight lift where the veneer meets the moulding, and a tiny crack along the bottom stile. By observing the grain and the age of the finish, we formed a plan to stabilise the surface without masking history. We tested the alignment of the glazing and checked the clock's back panel for humidity-induced distortions, then documented all findings with measurements to guide later touch-ups.
We prepared a modest workspace with a resin pad, a soft cloth, and a bench key, so each movement could be tracked without drift. We built a simple workflow: clean, assess, patch, finish, reassemble, test. The plan centred on conserving the walnut's warmth and keeping the patina intact, even where varnish had softened or dulled. We chose a light cleanup with mineral spirits, followed by a gentle pass with 0000 steel wool to remove surface grime without feathering the grain. The colour guidance came from the clock's inherent amber depth, which would dictate a satin finish rather than a high gloss.
 Save
Save
Disassembly and cleaning
With the movement protected, we turned to the cleaning stage and tackled grime without dissolving the patina. We swabbed brass components with isopropyl alcohol, then gently brushed oil residues from the gears until the teeth moved with a clean, quiet feel. We inspected bushings and pivots under a loupe, noting wear that would influence timing rather than appearance. The dial glass received a careful wipe, avoiding abrasive contact that might scratch the surface or blur numerals. The inner mechanism began to reveal a discipline we hadn't anticipated: patience pays for precision.
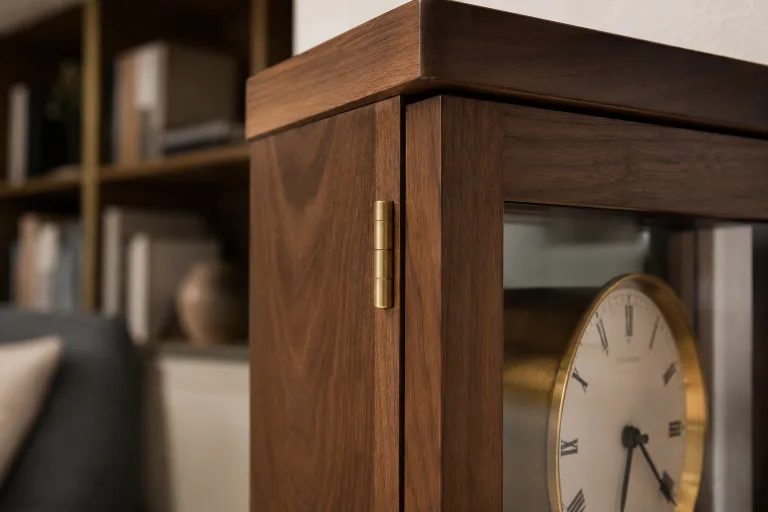
Next we addressed the veneer, balancing moisture and tone: a light sanding with 400 grit, a careful application of linseed oil to lift the grain, and a pale shellac layer to seal the wood. We patched a few veneer losses with a matching filler, feathered the edges, and allowed the surface to cure before a final buff. The finish was purposely restrained to harmonise with the living space. The clock's economic dignity came from restraint rather than bravado, and we respected that.
“The clock teaches patience with every quiet tick and subtle grain change.” — Mira
 Save
Save
Finishing and assembly
Finishing and assembly began with the case: we restrained ourselves to a single satin shellac layer, chosen to even tone and preserve the walnut's depth. We allowed each coat to cure fully, then inspected the finish under raking light to catch any unwanted sheen differences. The clock frame took on a uniform warmth that complemented the living space rather than demanding attention. Our approach remained slow and disciplined, mirroring the clock's own patience.
Reassembly required vigilance: we aligned the dial, reattached the hands, reinserted the movement, and replaced screws in the correct order. We tested the winding mechanism and ensured the pendulum hung true, adjusting the beat rate with tiny increments. Once the mechanism moved smoothly, we checked the case for dust and matched the finish on exposed metal parts to the wood's glow. The restoration read as a single story between clock and room.
- Disassemble gently and document every screw position.
- Polish brass hinges with 0000 steel wool and light oil.
- Apply a single satin shellac to the walnut to even tone.
- Test run the movement for 24 hours and adjust timing.
 Save
Save
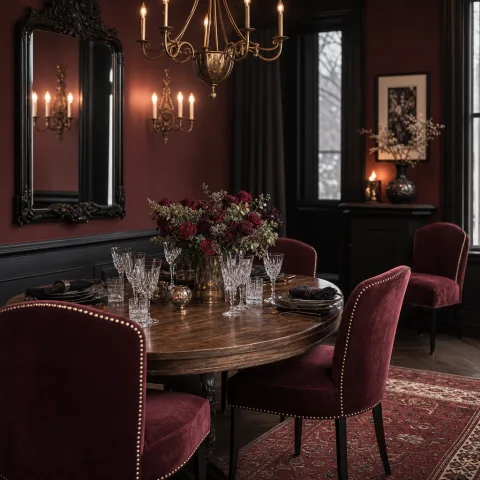
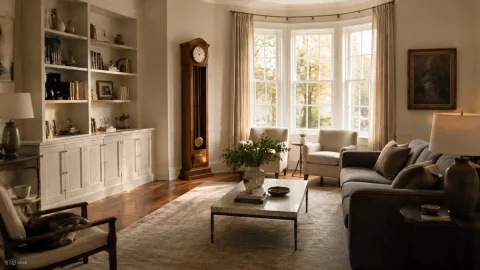
Final placement and reflections
Mounting day arrived with a trace of daylight across the floorboards. We fixed the clock to the wall with a secure fixture, checked the level against the cornice, and calibrated the pendulum to run a touch slower on the first 24-hour cycle. The room's palette94cream walls, warm walnut floor, charcoal sofa, and brass accents94held steady as the clock settled into a quiet, dignified rhythm. The moment felt ceremonial, not theatrical.
Looking back, the weekend work was about listening more than acting. We slowed the pace, let the grain speak, and allowed mechanical accuracy to emerge through careful hands and small tests. The walnut clock now marks time with a soft whisper and a living presence, and the room breathes around it as a space built for slow living.
We conclude with a practical note: maintain the clock with periodic dusting, a light oiling of pivots every few years, and a dry, stable environment to prevent moisture impact. The piece remains a student and a companion in the room, guiding us toward patience, silence, and a slower sense of pace.
How to do it
Initial assessment
We inspected the case, tested the movement, and identified worn pivots and oxidised screws; we documented findings with notes and photos. We noted veneer lifts and minor cracks, and we measured gaps to plan joinery or veneer patches where needed. The assessment also included climatic considerations for the room to anticipate future movement in the case.
Disassembly and cleaning
We carefully removed the movement, protected the dial, and cleaned gears with a solvent that would not strip old lubricants. We treated timber with a light oil, masked the dial, and laid out screws in labeled dishes. We cleaned pivots and bushings under magnification, recording wear patterns and any play that would influence timing more than appearance.
Finishing and reassembly
We repaired minor blemishes, patched veneer losses with matching filler, and applied stabilising shellac to even tone. After reassembling the movement, we checked each screw, reattached the dial and hands, and verified the alignment of the striking stops. We exercised the winding mechanism slowly to ensure smooth engagement and quiet operation, then inspected for any binding in the gears.
Final adjustment and wall mounting
We mounted the clock on the wall, levelled it against the cornice line, and tested the pendulum through multiple cycles to confirm stable beat. We adjusted the beat rate in small increments, dialed in timekeeping within seconds per day, and cleaned dust from the case before securing all hardware. The overall task concluded with a restrained, lasting integration into the room.
Frequently asked
What condition was the clock in at the start?
Which materials did we use for the finish?
How long did the restoration take in total?
Did we replace any parts?
How do we maintain the clock after restoration?
What is the final aesthetic of the clock in the room?
What did this project teach us about slow living?
In closing
The weekend project reminded us that restoration is a careful dialogue between object and place. We learned to recognise when a surface deserves restraint and when a mechanism requires patient testing rather than a quick fix. Restoring the walnut clock within two days allowed time to move through the room with a softer cadence, rather than insisting upon a rapid change. The final clock carries its own history forward, grain character, dial patina, and a measured beat that suits a room built for slow living. In that spirit, we will continue to measure twice, finish once, and invite minutes to become a kinder, more deliberate rhythm in our spaces.